

Showing posts with label artist life. Show all posts
Showing posts with label artist life. Show all posts
Sunday, August 14, 2016
Art Fest / Infusion Art t-shirt design
Next month I will be participating in the first annual Infusion Art Artfest in Beavercreek, Ohio where I will be showing off some of my artwork and peddling my wares. I also just wrapped up a t-shirt design for an art endowment called Infusion Art to be sold at the event. While brainstorming ideas I started doing research on art goddesses and came across a wikipedia entry for a Benzaiten and thought it would be a perfect visual way to not only represent an artist but depict various different art techniques and tools.


Wednesday, January 27, 2016
Dr. Martins Concentrated Watercolors
As mentioned in previous posts one of my favorite mediums to work in is Dr Martin's Concentrated Watercolours. I was introduced to these in one of my illustration classes in college and have loved using them ever since.
 Dr. Martins are sold in sets of various colors, but I always found it easier just to use primary colors and mix everything. Using Scarlet Red, Lemon Yellow, and True Blue, I can pretty much create any color I need and it has taught me tons about color theory along the way.
Here's some more examples of pieces I've done in that medium. The thing I love about them is the fluidity of them and some of the weird effects you can do.....here's one of the first pieces I did with them.
Dr. Martins are sold in sets of various colors, but I always found it easier just to use primary colors and mix everything. Using Scarlet Red, Lemon Yellow, and True Blue, I can pretty much create any color I need and it has taught me tons about color theory along the way.
Here's some more examples of pieces I've done in that medium. The thing I love about them is the fluidity of them and some of the weird effects you can do.....here's one of the first pieces I did with them.
 Here's some more pieces from over the years of various styles but all in Dr. Martins (and Microns and Bombay black ink for lines in some cases)


 and my most recent piece that I just did the other day......
 For my highlights I either do one of three things. 1. If I can plan far enough ahead, use masking masking fluid to brush over where my highlights would be, paint over it and then peel up when I'm done leaving the white of the untouched surface. 2. Depending on the surface I'm painting on going in with bleach and a brush and "painting" in my highlights. This doesn't seem work on watercolor paper (probably because of the absorption ), but seems to work really well on different kinds of illustration board. 3. Just use titanium white paint and paint my highlights in.
p.s. Be sure and get a UV fixative spray. One of the things about Dr. Martin's is they fade pretty quickly if left in direct light or sunlight unsprayed. But fixing them and if you get them framed putting them under UV glass helps protect them. As a precaution, If a piece is small enough, I make sure to scan them as soon as they are sprayed and if I think I might want to make prints down the road.
For my highlights I either do one of three things. 1. If I can plan far enough ahead, use masking masking fluid to brush over where my highlights would be, paint over it and then peel up when I'm done leaving the white of the untouched surface. 2. Depending on the surface I'm painting on going in with bleach and a brush and "painting" in my highlights. This doesn't seem work on watercolor paper (probably because of the absorption ), but seems to work really well on different kinds of illustration board. 3. Just use titanium white paint and paint my highlights in.
p.s. Be sure and get a UV fixative spray. One of the things about Dr. Martin's is they fade pretty quickly if left in direct light or sunlight unsprayed. But fixing them and if you get them framed putting them under UV glass helps protect them. As a precaution, If a piece is small enough, I make sure to scan them as soon as they are sprayed and if I think I might want to make prints down the road.


Saturday, January 16, 2016
Star Wars sketch cards
It's no surprise that I am a HUGE Star Wars fan. Sometime I'll go more in depth about my love for SW - let's just say it was pretty much 75% of my childhood whether it was movies, toys, or just things I liked to draw. So after contacting them, I was asked by Topps to create some sketch cards for an upcoming Mars Attacks trading card set. My hope was to do Star Wars stuff for them so I jumped at the chance and created over 200 cards for their 2012 Mars Attacks Heritage set. For people that don't know, sketch cards are blank cards that are sent to artists for them to draw original sketches on. These cards are then sent back to Topps and they are randomly inserted into packs of cards and sold to the public. Some of these cards go for big money on Ebay, and are highly sought after. So after doing Mars Attacks cards I was also invited to contribute sketch cards to their 2012 Star Wars Galactic Files set. Artists use a variety of materials for their cards, for the most part I did my cards with Prismacolor markers. The first thing I had to do was figure out what colors I needed to pull off the most amount of characters and found an infographic displaying Lego's versions of all their Star War figures. So looking at it blurry eyed I was able to figure out I would need a variety of browns, skin tones, oranges, creams, red, various greens, and a couple blues. A lot of people basically do realistic likenesses of the different characters and for a couple here and there I did the exact same thing, but overall I wanted to really give my spin on the characters of Star Wars, different scenes that had meaning to me, and basically show my memories of watching the movies filtered through my brain. Here's some of my cards from that first set.


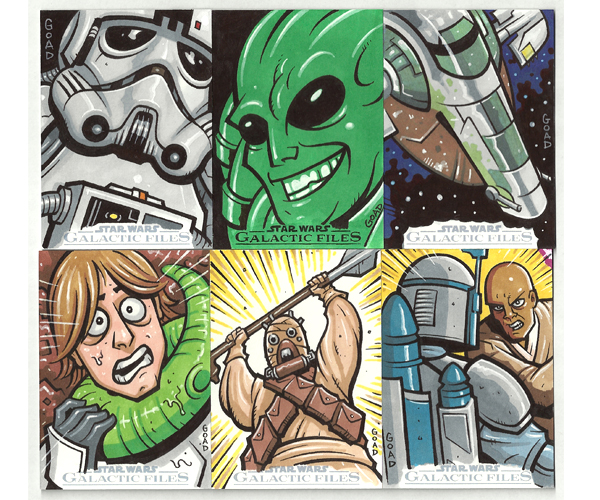


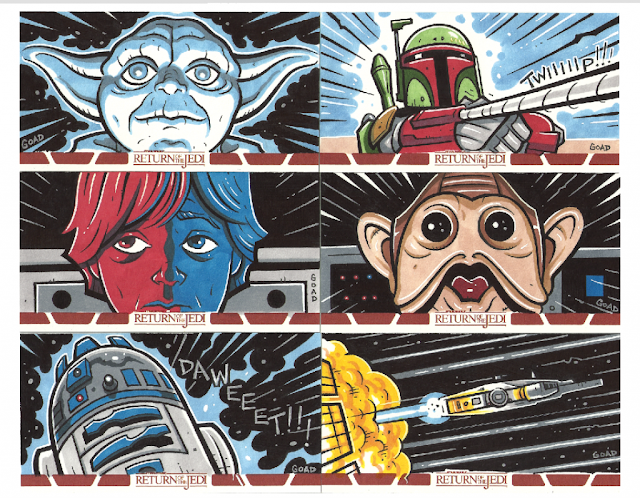
 Next up I contributed to their Return of the Jedi widevision set..I really had a lot of fun on these, because of the different format - allowed me to really be cinematic since that's the way I always view those movies in my head. There was also some special cards that had prop pieces embedded in them - in this case parts of the sail from Jabba's barge and fur from various Ewoks. The sail barge one gave me a chance to illustrate one of the biggest travesties in all of Star Wars history. I speak of course of the death of Boba Fett, who if you don't count the comic books as canon is most likely still being digested in the Sarlacc's belly.



 Next up I worked on sketch cards for 2015's Star Wars Masterwork set. These cards were "special" in that they were high end product sold for $50 a pack and had high probabilities of getting sketches or other rare cards in them. I have to admit this bothered me a little bit because I wanted the average person to be able to get a hold of one of my cards, not just people who were going to open them and instantly flip them. So to be a little subversive I set out to do a number of them with unpopular and obscure background characters on them. I chuckled as I draw the Death Sticks guy from Attack of the Clones and I giggled as I drew Jar Jar Binks goofily giving a thumbs up, knowing there was a high probability some guy who couldn't care less about Star Wars was going to find them in a pack and curse the heavens. But I also realized I was also making some pretty rare sketches because no one in their right mind would ever want to draw Boshek or the dude with the horn on his head in the Cantina scene. Of course I've never claimed to be in my right mind.

 HEY LOOK IT'S RIC OLIE!
 But it allowed me to have fun with the cards and washed away any ill will I had about the price point. One thing that was good about these cards though was they were on a much thicker card, so this allowed me to use different media including watercolor and acrylics......


 And last but not least I contributed cards to Topps' 2015 Star Wars Rebels set......I was kind of apprehensive because I would essentially be illustrating characters that already had a recognizable style, but I think my personal style melded pretty well with it....if you haven't checked out that show yet, it's great. They completely nailed the tone of the original movies and the new characters they introduce are really cool....
 Anyway, check out Ebay as my cards show up from time to time. Coincidentally (wink wink), I also have two of my cards up on Ebay right now....
Luke Return of the Jedi card
Anyway, check out Ebay as my cards show up from time to time. Coincidentally (wink wink), I also have two of my cards up on Ebay right now....
Luke Return of the Jedi card
 Yoda Return of the Jedi stainglass
 Anyway, hope you dug all these. MAY THE FORCE BE WITH YOU.


Saturday, January 9, 2016
Materials
Here's some of the different material / products I use...as far as brushes this isn't all the different types and sizes of brushes I use, but the two brands I use.
From left to right: Tuff Stuff Eraser stick. This is basically like the plastic eraser photographed below, but can be sharpened like a pencil to erase tighter areas and create highlights.
Staedtler mechanical pencil with .003 lead. I vary what hardness of lead I use in it, but it's usually either 2H or at softest HB.
For my brushes I almost exclusively get them at United Art and Education. I'm not too particular about the quality of my brushes, because as I'll get to eventually I use paint that would probably hurt really expensive brushes. Plus thats just added stress....
But I either use United Art's own brand of brushes (red handle) or Black Silver's by Dynasty. The cool thing about the Black Silver's is that all their brushes are the same price no matter how large or small ($2.69 if I remember correctly).
I also use Berol Prismacolor Verithin pencils for sketching. I start off with Non-Photoblue to roughly sketch things out, and then tighten up with Indigo Blue.
 Next up, the type of paint I use is Liquitex Basics. These are around $5 a tube and I only use primaries - Napthol Crimson, Primary Yellow, Ultramarine Blue, and Titanium White and just mix whatever colors I need. Sometimes a painting will call for a Cobalt Blue, but other than that I like to just mix it. Over the years working that way has taught me immensely about color.
But I just love the consistency of Liquitex Basics.....I can't stand the waterier (is that a word? Spellcheck says it is) paints.....
Next up, the type of paint I use is Liquitex Basics. These are around $5 a tube and I only use primaries - Napthol Crimson, Primary Yellow, Ultramarine Blue, and Titanium White and just mix whatever colors I need. Sometimes a painting will call for a Cobalt Blue, but other than that I like to just mix it. Over the years working that way has taught me immensely about color.
But I just love the consistency of Liquitex Basics.....I can't stand the waterier (is that a word? Spellcheck says it is) paints.....
 Here's some examples of acrylic paintings I've done with Liquitex Basics.


 For my watercolors I use Dr. Martin's Concentrated Watercolors. Same with the acrylics I only use primaries - in this case True Blue, Lemon Yellow, and Scarlet Red. I was introduced to these by Mark Hazlerig, one of my illustration teachers at CCAD. They are more like ink and you can do some really crazy effects with them. For inking I used to use microns but have switched over to using a brush and Dr. Martin's Black Bombay. I used to use other brands of bottled ink, but Bombay by far is the most consistently black ink I've ever used. Solid as hell.
 Also real important for using Dr. Martin's inks is their 30 well palettes....easier to mix colors with and you won't waste your ink as much. Even when it dries like seen in the picture you can re-activate it with a little water....
 Here's some examples of Dr. Martins pieces I've done over the years...they're cool because they work well tightly and loosely....if you ever use them though, be sure and spray fix them with Krylon UV Fixative as they will will fade quickly if left in direct light for long periods of time.


Subscribe to:
Posts (Atom)